


Latest sewing, a variation of the classic 1950s Brigitte Bardot style gingham dress.
Decided to go with the Stil 9743 pattern from my stash, I've never used it before so of course it needed a whole bunch of tweaking (because tall + big boobs). It took circa seven fittings to get the fit quite right (and now the dress looks good but I can't breathe wearing it!)
The fabric is a vintage find from the local thrift store and I had just enough to make the dress... as long as I omitted the sleeves and the belt... but this simple variation looks fine too I think!

Sunday, July 17, 2016
Gingham Dress
Monday, March 21, 2016
1930s inspired grey pencil skirt
I got something done! Yay me!

I decided to pull myself out of the "omg I have too much fabric and patterns and don't know where to start panic" by going for whatever would be the answer to: What do I need most right now? Well, a simple but great skirt to wear at the office! So, pulled out the grey vintage mystery fabric from the pile and begun! (I remember buying the fabric in a thrift store waaayyy back, and it feels like a wool/cotton mix of some sorts... maybe. Hence - mystery fabric.)
Of course I was about 2-3 inches short of fabric for using any of the skirt patterns I've been longing to use - surprise! So, decided to draft a super simple, fairly long straight skirt /pencil skirt design based loosely on these inspirations:
Unfortunately, since I took the pictures right when I got home from work, in the hallway... they are not so fancy: weird light, skirt looks a bit wonky (my face looks more than just a bit wonky) and my shirt is all creased from two hours on public transportation... But I am now in my sweatpants and don't want to change back, so you'll have to live with it, heh! ;)


Next time (when I have more fabric, perhaps!) I'll give it a bit of flare at the bottom, since the 1930s skirts often did... I just didn't have enough fabric for that this time! Anyway, my favorite part about the skirt is the detail I added with the vintage trim sewn into the waistband.

 I really wanted to do a good job this time so I french seamed as much as possible. Takes a bit of time but seriously why don't I always do that, it looks so neat!?


I also folded in the waistband - along with that awesome white vintage trim - (sorry for gushing, I love it) to make the zipper as invisible as I could. The seams look all crooked on the inside... as usual. But it gets better with more sewing, and as long as the outside looks great, who cares?
...and although I sewed the zipper on the machine I hand stitched to make the fabric lay flat on top of it. (It still doesn't - especially not in this picture - but I tried.)
 Also I hemmed the skirt by hand. Not my favorite thing to do, so mark my surprise when that was a quick and easy procedure! And no it's not super uneven, it just looks like it in this picture... perspective...

I decided to pull myself out of the "omg I have too much fabric and patterns and don't know where to start panic" by going for whatever would be the answer to: What do I need most right now? Well, a simple but great skirt to wear at the office! So, pulled out the grey vintage mystery fabric from the pile and begun! (I remember buying the fabric in a thrift store waaayyy back, and it feels like a wool/cotton mix of some sorts... maybe. Hence - mystery fabric.)
Of course I was about 2-3 inches short of fabric for using any of the skirt patterns I've been longing to use - surprise! So, decided to draft a super simple, fairly long straight skirt /pencil skirt design based loosely on these inspirations:
 |
| 1930s fashion plates. Source: NYPL. |
 |
| More 1930s skirts, source: http://wearinghistoryblog.com/2013/11/1930s-inspiration-season-your-wardrobe-for-the-season/ |
Unfortunately, since I took the pictures right when I got home from work, in the hallway... they are not so fancy: weird light, skirt looks a bit wonky (my face looks more than just a bit wonky) and my shirt is all creased from two hours on public transportation... But I am now in my sweatpants and don't want to change back, so you'll have to live with it, heh! ;)


 I really wanted to do a good job this time so I french seamed as much as possible. Takes a bit of time but seriously why don't I always do that, it looks so neat!?

I also folded in the waistband - along with that awesome white vintage trim - (sorry for gushing, I love it) to make the zipper as invisible as I could. The seams look all crooked on the inside... as usual. But it gets better with more sewing, and as long as the outside looks great, who cares?
...and although I sewed the zipper on the machine I hand stitched to make the fabric lay flat on top of it. (It still doesn't - especially not in this picture - but I tried.)

Wednesday, March 16, 2016
Spring fabrics, patterns and more plans...
Days go by so fast and still no sewing! Instead I've spent hours upon hours of looking through my patterns, pattern magazines and trolling Pinterest for even more inspiration (like I need more...? I need less! Don't know where to start...)
Anyway, since I promised little over a week ago (in my inspiration collages post, here) I would share what fabrics and patterns are in the plans for spring, here goes!
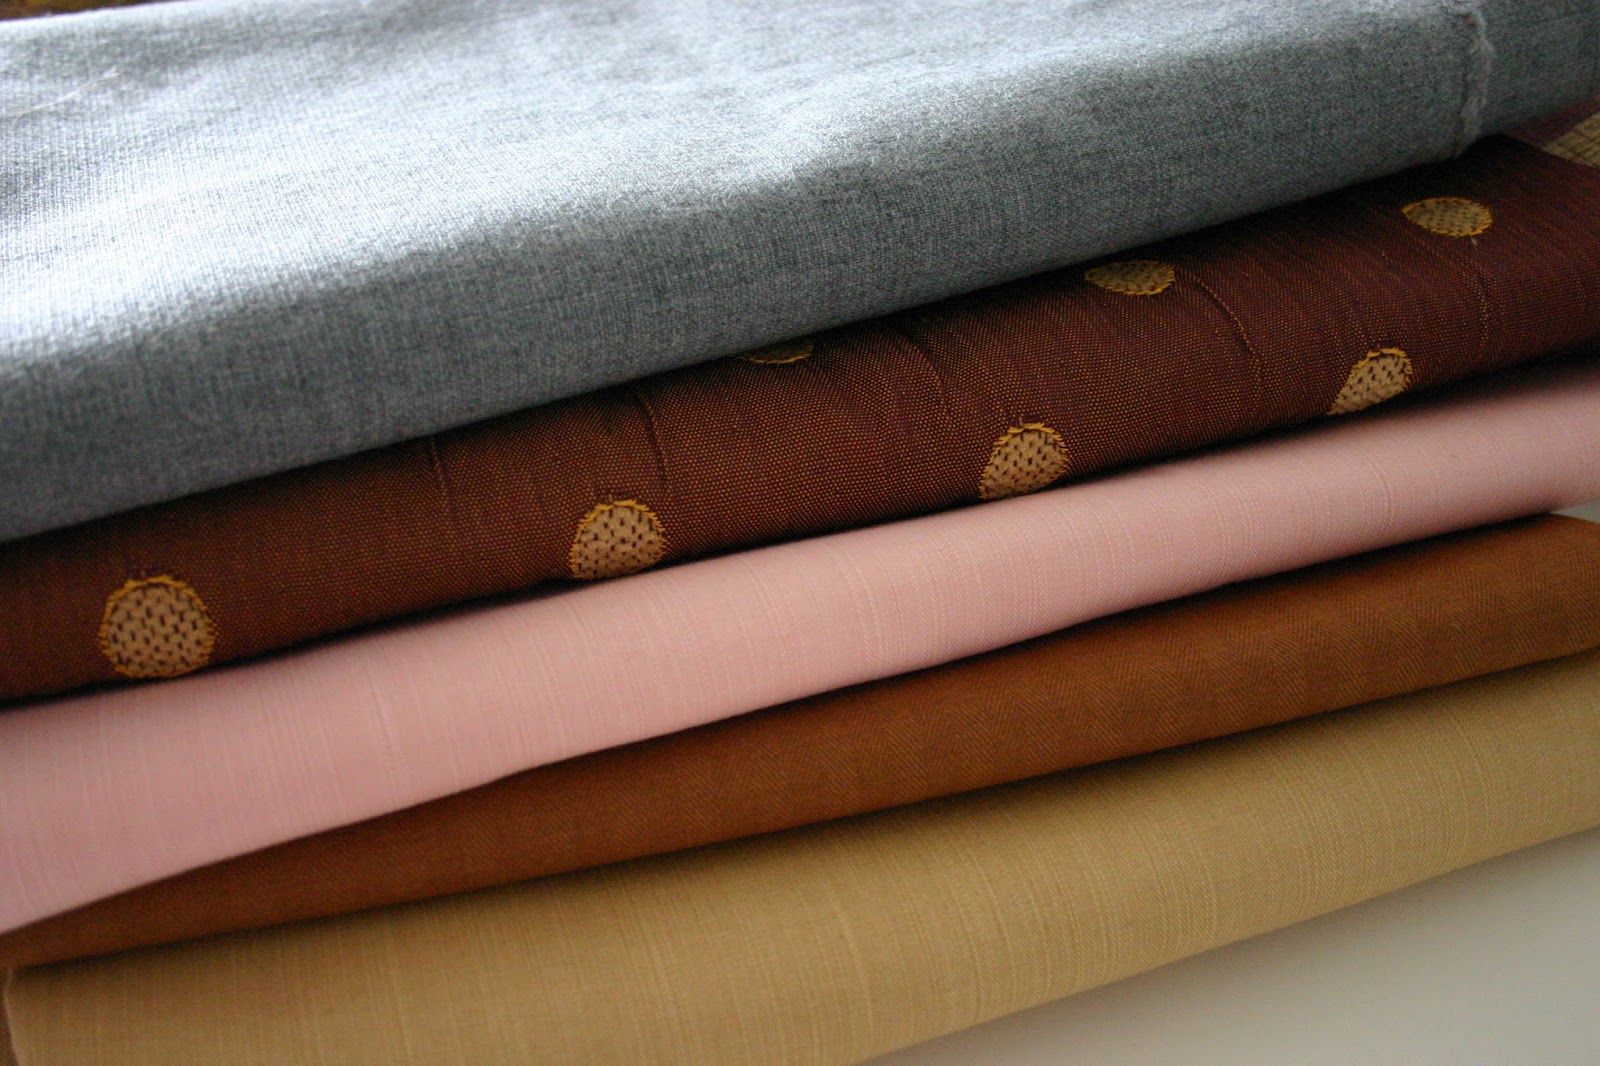 |
| Grey, beige and brown with a hint of pink for skirts and pants. |
 |
| Light, bright and cute cotton and polyester in stripes, florals and gingham for tops, shirts and dresses. |
 |
| Pops of color and more luxe fabrics for even more tops and such. From top: black peachskin polyester, blue crepe georgette, hot pink silk charmeuse, bright red chiffon and then one more silk (that is much brighter orange irl than in the picture!) |
 |
| Late 40s to 50s skirts. I also really want to make a more 1930s type of slim skirt and I have no pattern for that but I think I will make a pattern myself referencing some pattern envelopes and fashion plates from the period. |
 |
| Adorable 1950s blouses! |
 |
| Wide pants to wear at the office... patterns from early to late 1970s |
 |
| And a dress maybe... don't really need anymore dresses but... yeah. I most of all want to make the McCall from 1949, love love love the look! |
 |
| Also there's the pile of new and semi-new burda magazines... I think these are good for relaxed tops, patterns where I get to use stretch fabrics and some current ideas. |
 |
| Aaaand of course the pile of old burda and neue mode magazines, the ones I've got span from 1969 to 1982 so lots of reat ideas there as well... |
Have a great week, hopefully next time I post I will actually have sewn something!
Friday, March 4, 2016
Inspiration collages for spring 2016
So, I've been spending some time planning what I want to make for spring! I realized that even if making dresses is great fun, what I really need is separates. Something that works an ordinary day at the office or just when I want to look great for a date with the husband but not wear a dress! Blouses, shirts, skirts, dressy pants... All those things that are a bit more tricky to sew than just another shift dress. But I figured, if I pulled off making the wedding dress last year, a buttoned blouse couldn't possibly be any worse.
I have some great "new" sewing patterns from the 1940s and 1950s that I am coosing between, and some old and new issues of Burda Style for more current fashion ideas... (and perhaps one or two 1960s/1970s patterns as well) so um, lots more than I actually need and have time for...
I managed to snag some absolutely fantastic fabrics from the thrift store located next door to my current workplace... I have never been so tempted to compulsively shop everyday in my life! Have to stay at work long enough to make sure I more or less have to run to the train to make sure I don't "just pop in for a quick look"... Plus everything is embarrassingly cheap! Also I just bought some new fabrics online that are being shipped right now, cant wait too see them!.
While waiting for fabrics and deciding which patterns to use, I thought I'd share some inspiration from my newly acquired Pinterest account and boards, here: https://se.pinterest.com/ewaelsavictoria/
(All following pics are (c) their respective owners and found on Pinterest. Had the "embed function" still worked on Blogger I would have done that, but sadly, I tried and nope.)
 |
| White blouses galore! |
 |
| Office wear, suits and more |
 |
| All kinds of great skirts |
 |
| Gingham, blues, yellows, corals, reds... |
This is where I'm at right now, but it'll most likely change a bit here and there, and then comes summer and I'll probably want even more colours and prints. But anyway, finding inspiration is great fun!
I'll be back to show you my new patterns and fabrics soon! Until then, have a great week and hang in there, spring IS coming!
Wednesday, February 24, 2016
Peplum blouse (wearable muslin)

So, for a very long time I've been wanting to make a late 1940s style peplum blouse. I just love the look and I do have a few store-bought ones but they really don't fit so well on my tall and big-boobed figure. The waistline ends up too high and/or the bust pulls up the fabric in the front... Guess how often I use them...? Pretty much never.
I drafted a pattern based on my standard bodice and this picture i found on Pinterest (here: http://pin.it/4A7USbS ).

A quick Google search and I found the front of the pattern envelope. Really cute, right?

I used those pattern pics as a guide and made a simple boat neck and nothing extra on this first attempt, mainly because I wanted to test the basic structure but also since I chose a busy fabric. Also I decided to put an upside-down zipper in the back. You can see the layout from the inside:

I learned a few things from this muslin! For one I hate zippers (ok I admit I knew that already. I need practice.). The old synthetic fabric scrap I used for the project (some rayon-ish thing) is very stiff and loves to make strange folds and puckers everywhere. Very obvious in the picture below.. (and that's the best pic from the back out of the six I took!) Also I really should have put on some more structured underwear (like, a corset or shaper of some sort) before taking these pictures... but anyway, could have been worse.


I need to adjust my pattern in the upper back (I am not quite as hunchbacked as I seem to think) and below the waist in the front (to make it even more hourglass shaped). But overall, not bad for a first muslin!
Wednesday, February 10, 2016
The 'Pink Experiment' Dress
Finally a new dress sewn after the Big White Wedding Dress last year!
I may have broken myself a bit on that one. (Well, ok, perhaps not just on that, considering I am still recovering from my occupational burnout #2 so far in life...)
Anyway, I've been going over my patterns and fabric stash a lot lately and been really itching to get some sewing done. At last I dared to try something and so I opted for a very simple dress (with only one new constructional detail) and a fabric I think I at some point got for free! In other words: a very low pressure project, seemed like a good idea.
Here's how it turned out! (and you get a peek of my messy but colorful workspace and fancy dress collection - old, new, homesewn, storebought and inherited - in the background, you're welcome...)

 Since the fabric is striped, I've always known I wanted to use the stripes as a slimming feature, in some clever construction thing... So, I used my absolute favorite pattern making book from 1956 again to alter the darts on my me-made standard dress pattern. This V-shaped dart-design was perfect for my plan!
I also did a "decorative" double stitched seam on the edges and to highlight the darts. It's hard to see from a distance so here are some closeups!

The next time I make a dress from this pattern I am going to shorten the bodice back and lengthen the front a bit. I have a bit of a sway back so there is some bunching around the waist mid back. Also since I am "top heavy" i.e. carrying around a (European size) 75F bust, it's always tricky to calculate how much extra length to add mid front to make the waist sit right both front and back... You can see in the following picture that when I move around in the dress there is a lot of unnecessary wrinkling because of this.

Still, I am pretty happy by the results. I think it's a great dress for both a fancy day at the office (perhaps paired with a short black jacket and some more low-key shoes) or a dinner at a nice restaurant (like I'm wearing it the pictures)! Plus I have more nice fabrics in my stash that I could use for making more versions and perfecting this pattern.

I may have broken myself a bit on that one. (Well, ok, perhaps not just on that, considering I am still recovering from my occupational burnout #2 so far in life...)
Anyway, I've been going over my patterns and fabric stash a lot lately and been really itching to get some sewing done. At last I dared to try something and so I opted for a very simple dress (with only one new constructional detail) and a fabric I think I at some point got for free! In other words: a very low pressure project, seemed like a good idea.
Here's how it turned out! (and you get a peek of my messy but colorful workspace and fancy dress collection - old, new, homesewn, storebought and inherited - in the background, you're welcome...)


I also did a "decorative" double stitched seam on the edges and to highlight the darts. It's hard to see from a distance so here are some closeups!

The next time I make a dress from this pattern I am going to shorten the bodice back and lengthen the front a bit. I have a bit of a sway back so there is some bunching around the waist mid back. Also since I am "top heavy" i.e. carrying around a (European size) 75F bust, it's always tricky to calculate how much extra length to add mid front to make the waist sit right both front and back... You can see in the following picture that when I move around in the dress there is a lot of unnecessary wrinkling because of this.

Still, I am pretty happy by the results. I think it's a great dress for both a fancy day at the office (perhaps paired with a short black jacket and some more low-key shoes) or a dinner at a nice restaurant (like I'm wearing it the pictures)! Plus I have more nice fabrics in my stash that I could use for making more versions and perfecting this pattern.

Wednesday, February 3, 2016
The big knit blanket
So - I finally finished making the blanket!

Not that the work itself has taken a lot of time, I've just been doing other stuff. I love that it came out kind of like a modern hippie thing, all colors at once and quite weird and wonky.


There was supposed to be a picture of the needles here but someone (Pippin the fluffball) decided to lie on them when I had the camera out so, no. (Or rather, you can't really see them...)


After that it's assembly time! This, if ever, is the perfect time to bring out that massive crochet hook... like the one I have neatly put away in some good spot last summer and can't find. But, no worries, it works perfectly fine to just tie them together by hand!
Here it is!

The blanket is made from all those jersey tops and t-shirts that had so much holes and wear that they had been downgraded beyond the "slopping around at home"-pile. And since I am one of those people that have a slight inclination towards... um, hoarding I guess... well, I had a lot of them.
23 to be exact. Some were strap tops, so very little fabric there, and some were tunics. These made a very heavy thick blanket of circa 120*120 cm, when not stretched.
A little bit of How to, for those interested:

First of all, find your "yarn" and from there, pick the size of your project and what knitting needles to use. You can buy very thick yarn resembling fabric scraps and avoid the boring bit that is cutting the fabric, but at least here in Sweden, those yarns are ridiculously expensive.
Another idea if you don't save your crappy old t-shirts like I do, is to buy some lightweight jersey fabric (these are often very cheap / on sale when next seasons colors come in) and use for making the yarn!
Some of the tops I could tear instead of cut but mostly they are either woven in a way or have been washed and worn so much that they do not tear in any straight-ish lines at all.
If you decide to cut up old tops, there is no right or wrong way to make the yarn. I both tried cutting back and forth in a zigzag-pattern and starting from the bottom and cutting in a spiral.
Since I had, well, loads and loads of fabric that I could use, I just ballparked how thick I wanted my blanket and went with size 15 needles and cut the fabric into roughly inch-wide ribbons. I did not care at all if the yarn varied in thickness.

I ended up casting on 40 stitches, mainly because the needle was getting awfully crowded, and that it seemed like a nice even number.

I decided to do a wide rib stich (this might be called something else when you do five knit, five purl instead of the common one or two..?).
To make a big blanket (for a cold winter day spent in the couch) I went for making four separate pieces and assemble into one. 40 stitches on size 15 needles made for a 60 cm wide piece, and roughly 45 rows for 60 cm lengthwise. However the measuring tape is your best friend during this...
After making the four parts it's time to decide how to put them together (not really an issue if you have gone for buying/making your yarn in just one or a couple of colors). I just laid them out on the floor and changed it around until it looked ok.


I went for "as simple as possible" and mimicked a hemming stitch by just threading the yarn through and over the knitted stitches.
This can of course be done using some sort of needle too.
Again, not exactly perfection, but it looks good for the overall style of this type of project!
I tried to get some great pictures of what it actually looks like, on me, in my favorite chair. This is as good as it got after, um, way too many takes. The blanket is cozy, Speedy the cat is looking chubby and majestic, and I am making a very weird face. But it's all good.

I hope you are all having a great week! Peace and love, folks!
Saturday, January 16, 2016
New look
So, no sewing to show right now, I just wanted to comment on the fact that the blog has had a fairly big makeover!
I had been tired of the old look for quite a while now, but it wasn't really a priority. However, since I have been home on sick leave now for almost three months due to a massive occupational burnout (don't really know why the call it that when often this comes from too much in all aspects of life, not just work, right?!) I figured it was time to try and get back to creativity!
The new face of the blog is a lot more clean and simple. The messy background and extra add-ons are gone. I figure the blog photos are the important part anyway, so they should be the center of attention. I guess it reflects the things I'm going through at the moment, cleaning out the old mess, finding whats important and starting over from there.
I am currently working on a heavy knitted blanket made from old jersey tops that I have cut into yarn, I'll give you an update with lots of pics and perhaps a how-to-make as well soon!
I wish all of you a great and happy creative new start to the new year!
Subscribe to:
Posts (Atom)